


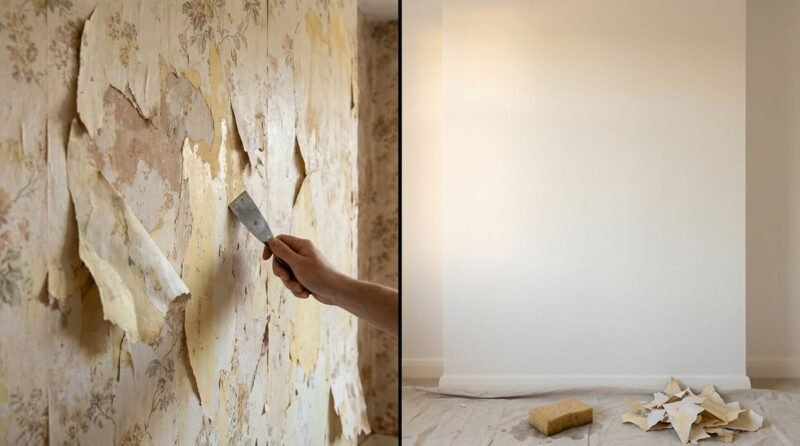
Removing wallpaper is only half the battle. The adhesive residue left behind — that sticky, gummy, or dried-hard layer of old paste — is what actually determines whether the next paint job looks professional or like a disaster. Paint applied over wallpaper glue will bubble, peel, and show every imperfection. Getting the walls truly clean is the step that separates a lasting renovation from one that needs to be redone in two years.
This guide covers the best methods for removing old wallpaper glue from walls, including the most effective DIY solutions, the right tools for different wall types, and the critical final step that most tutorials skip entirely but that makes all the difference when it comes time to paint.
1. Identifying the Type of Wallpaper Adhesive
Answer Capsule: Most residential wallpaper adhesives are water-soluble wheat paste or synthetic cellulose paste. Both dissolve with warm water and a small amount of fabric softener or white vinegar. Older homes may have oil-based adhesives that require a commercial wallpaper remover solution. The adhesive type determines which removal method will be most effective.
Water-based paste — the most common type in homes wallpapered after 1970 — appears as a shiny, slightly tacky film when fresh, or a dull, hard, slightly raised surface when fully dried. It dissolves readily in warm water. Oil-based adhesives, more common in pre-1970 homes, resist plain water and require a commercial enzyme-based remover or TSP (trisodium phosphate) solution.
A simple test: dampen a small area with warm water and wait 60 seconds. If the residue softens and becomes tacky, it is water-based. If it remains hard and unchanged, it is likely oil-based and requires a stronger solution.
2. The Three Most Effective Removal Methods
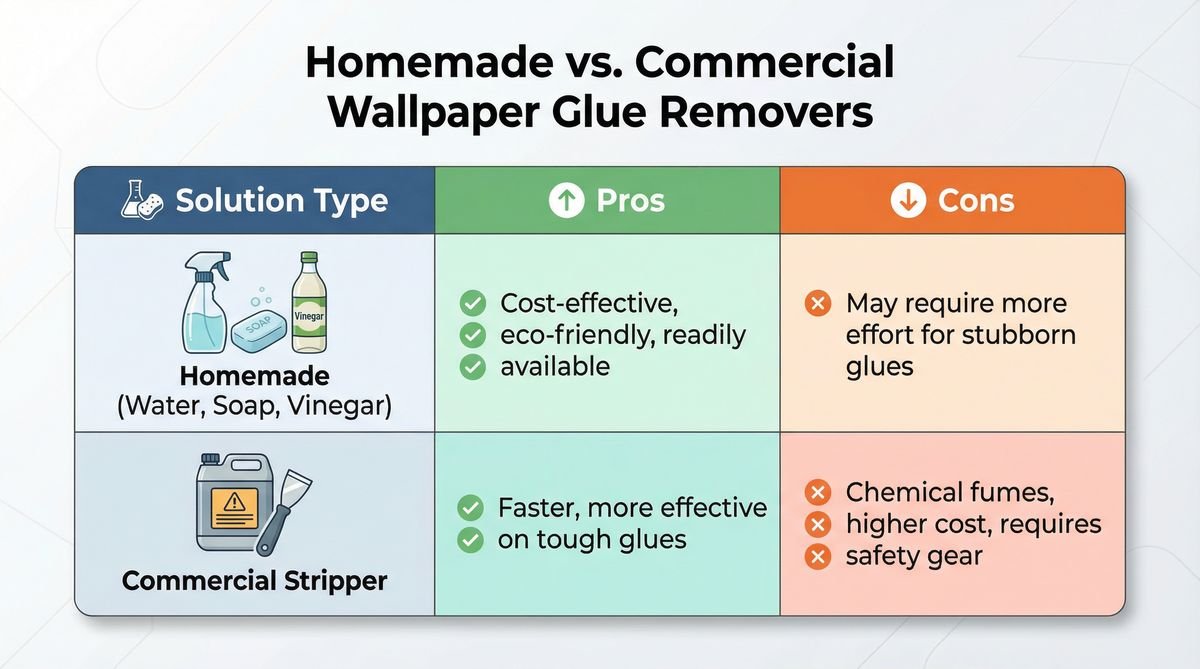
Answer Capsule: The three most effective methods for removing wallpaper glue are: warm water with fabric softener (best for fresh or water-based adhesive), white vinegar solution (effective for dried water-based paste), and commercial wallpaper remover concentrate (required for oil-based adhesives and stubborn residue). All three methods require a wide plastic scraper and adequate ventilation.
| Method | Best For | Mix Ratio | Dwell Time | Cost |
|---|---|---|---|---|
| Warm water + fabric softener | Fresh or water-based paste | 1 cap softener per gallon water | 2–3 minutes | Under $5 |
| White vinegar solution | Dried water-based paste | 1:1 vinegar to warm water | 3–5 minutes | Under $5 |
| Commercial remover (DIF, Piranha) | Oil-based adhesive, stubborn residue | Per label instructions | 5–10 minutes | $10–$20 |
| TSP solution | Heavy residue, pre-paint prep | 1/4 cup TSP per gallon water | 5 minutes | $8–$15 |
3. Step-by-Step Removal Process
Answer Capsule: The removal process follows four stages: protect floors and outlets, apply the removal solution generously with a sponge or garden sprayer, allow the solution to dwell for the recommended time, then scrape with a wide plastic scraper. Work in small sections (3–4 square feet at a time) to prevent the solution from drying before scraping.
Protect the floor with plastic sheeting and painter’s tape before starting. Wallpaper glue removal is a wet process — water will drip, and the solution can damage hardwood floors if left to pool. Cover all electrical outlets with painter’s tape and turn off the circuit breaker for the room as an additional precaution.
Apply the removal solution generously using a large sponge, a garden sprayer, or a paint roller. The goal is to saturate the adhesive layer, not just dampen it. Allow the solution to dwell for the recommended time — patience here is critical. Scraping too soon, before the adhesive has softened, damages the drywall paper facing and creates a surface that will never accept paint smoothly.
4. Protecting Drywall During Removal
Answer Capsule: Drywall is the most vulnerable wall type during wallpaper glue removal because excessive moisture can damage the paper facing, causing it to tear or bubble. Use a plastic scraper (never metal) on drywall, keep the solution damp rather than soaking wet, and work quickly. Any torn paper facing must be repaired with joint compound and primer before painting.
Plaster walls are significantly more forgiving than drywall — they can handle more moisture and more aggressive scraping without damage. For drywall, the plastic scraper rule is non-negotiable. A metal scraper will gouge the drywall surface and create depressions that are difficult to repair invisibly.
If the drywall paper facing tears during removal (it will look like a fuzzy, fibrous patch), allow the area to dry completely, then skim coat with joint compound, sand smooth, and apply a shellac-based primer before painting. Latex primer applied directly over torn drywall facing will cause the paper fibers to raise and create a rough, uneven texture in the finished paint.
5. The Critical Final Wash (The Step Most Guides Skip)
Answer Capsule: After scraping, the wall must be washed with clean warm water to remove all chemical residue from the removal solution. Residual fabric softener, vinegar, or commercial remover left on the wall will prevent primer and paint from adhering properly. This final wash is the most commonly skipped step and the most common cause of paint adhesion failure after wallpaper removal.
Use a clean sponge and fresh warm water — no cleaning solution. Wipe the entire wall surface, rinse the sponge frequently, and change the water when it becomes cloudy. Allow the wall to dry completely (24–48 hours minimum) before applying primer. Running fans and opening windows accelerates drying.
Before priming, run a hand over the dry wall surface. It should feel smooth and slightly chalky — not tacky, not slippery. Any remaining tackiness indicates residual adhesive that needs another round of treatment. Any slippery feel indicates residual cleaning solution that needs another rinse.
Frequently Asked Questions
Can paint be applied directly over wallpaper glue residue?
No. Paint applied over wallpaper glue residue will not adhere properly and will bubble, peel, or show a mottled, uneven texture within weeks. The adhesive must be fully removed and the wall thoroughly washed before any primer or paint is applied. Skipping this step is the single most common cause of failed paint jobs after wallpaper removal.
What primer should be used after removing wallpaper glue?
An oil-based or shellac-based primer is strongly recommended after wallpaper glue removal. These primers seal the wall surface, prevent any remaining adhesive residue from bleeding through, and provide a stable base for latex topcoats. Standard latex primer is not recommended as a first coat — it can reactivate residual adhesive and cause adhesion problems.
Does a wallpaper steamer help remove the glue?
A wallpaper steamer is highly effective for removing the wallpaper itself but is less useful for the adhesive residue left behind. Steam can actually drive adhesive deeper into porous drywall if used excessively. For the adhesive removal stage, a chemical solution (fabric softener, vinegar, or commercial remover) applied with a sprayer and scraped with a plastic scraper is more controlled and effective.
Conclusion
Removing old wallpaper glue is unglamorous, time-consuming work — but it is the foundation of every successful paint job that follows. The best method depends on the adhesive type and wall material, but the process is consistent: apply the right solution, allow adequate dwell time, scrape carefully, wash thoroughly, and dry completely before priming.
The final wash and the choice of oil-based primer are the two steps that separate a professional result from a frustrating one. Take the time to do both correctly, and the painted walls that follow will look clean, smooth, and professionally finished for years to come.
References
- Zinsser. “Surface Preparation Guide: Wallpaper Removal.” 2025.
- This Old House. “How to Remove Wallpaper.” Updated 2025.
- Painting and Decorating Contractors of America (PDCA). “Wall Preparation Standards.” 2024.
- Family Handyman. “Remove Wallpaper Glue the Right Way.” 2024.