

Shiplap, with its distinctive texture and versatility, has become a popular choice in modern home decor, capable of adding rustic charm or modern simplicity to any space. For beginners, installing this type of wall covering might seem like a daunting task, but with the right tools, meticulous planning, and step-by-step guidance, this DIY shiplap wall project can be easily accomplished, significantly enhancing the aesthetic appeal of your home.
Preparation: Tools, Materials, and Safety
Essential Tools: From Measuring to Cutting
Installing this popular wall treatment requires a range of basic tools to ensure precise measurements, efficient cutting, and secure fastening. Having the right tools not only simplifies the installation process but also enhances the professionalism of the final result. Key tools include a tape measure, pencil, level (or laser level), utility knife, power saw (miter saw or circular saw), nail gun (or hammer and finish nails), and a stud finder. These tools will help you accurately mark, cut, and secure the boards, ensuring each piece fits perfectly.
Choosing the Right Shiplap Boards and Fasteners
Selecting the appropriate shiplap material and fasteners is crucial for the success of the project, directly impacting the final appearance and durability. This wall covering comes in various materials, such as solid wood, medium-density fiberboard (MDF), and PVC, each with its unique advantages and costs. Solid wood panels offer a natural texture but are sensitive to humidity; MDF boards are economical and easy to paint but less durable than solid wood; PVC boards are waterproof and moisture-resistant, suitable for damp environments like bathrooms. Fasteners typically include finish nails or nails used with a nail gun, and their length should be sufficient to penetrate the panels and the wall studs, ensuring a secure hold.
Safety First: Protective Gear and Workspace Preparation
In any DIY project, safety is always the top priority, especially when using power tools. Before starting this wall panel installation, it is essential to wear appropriate personal protective equipment (PPE), including safety glasses, gloves, and hearing protection. Additionally, clear the work area, ensure there are no obstructions, and provide adequate power for power tools. Good ventilation is also crucial, especially when cutting wood or using adhesives. These precautions will minimize the risk of accidents and ensure a smooth project.
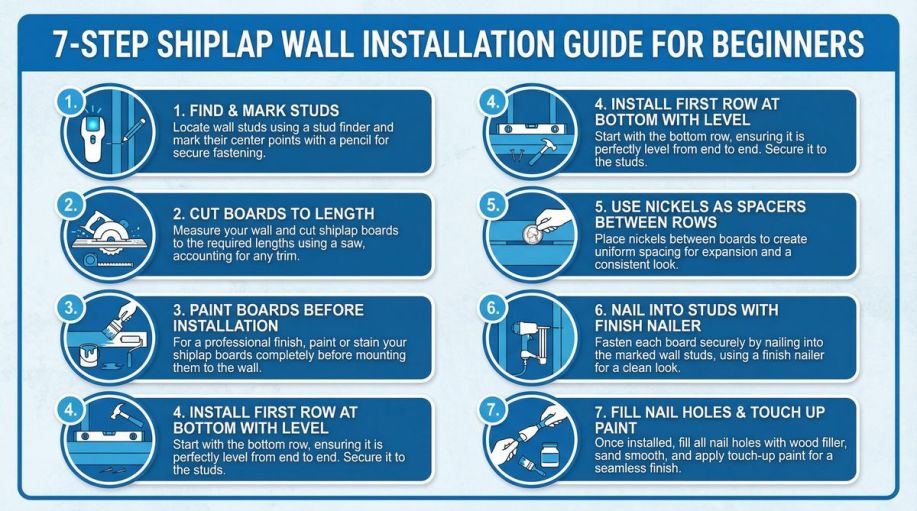
Step-by-Step Shiplap Installation Guide
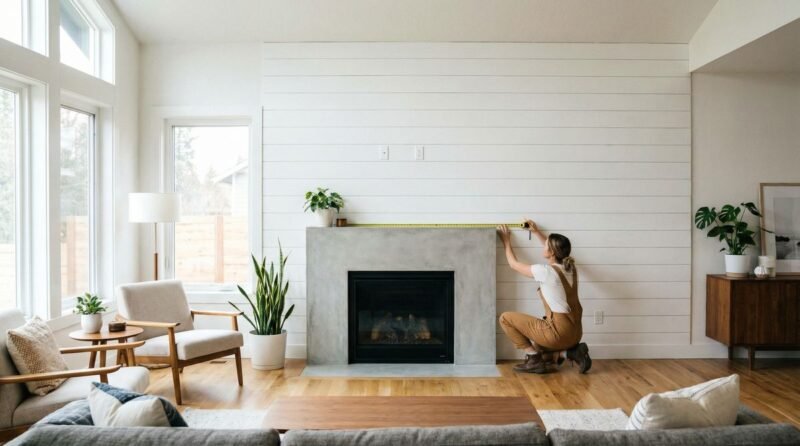
Preparing Your Wall: Removing Obstacles and Finding Studs
Thoroughly preparing the wall before installing these panels is a critical step to ensure a flat and secure foundation. First, remove all decorations, switch plates, outlet covers, and baseboards from the wall. Next, use a stud finder to accurately locate the wooden or metal studs within the wall and mark them with a pencil. These markings will guide you in precisely nailing the panels during installation, ensuring they are securely fastened to the wall and preventing future loosening or sagging. If the wall surface is uneven, it may require patching or using leveling compounds.
The First Board: Ensuring a Level and Secure Start
The installation of the first panel is paramount, as it will determine the alignment and overall appearance of all subsequent boards. Start from the bottom of the wall and use a level to ensure the first panel is perfectly horizontal. If the bottom of the wall is uneven, you may need to use shims for adjustment. Secure the first panel to the wall studs using a nail gun or a hammer and finish nails. Ensure the nails penetrate the panel and are firmly embedded in the studs, but do not drive the nail heads completely into the wood to avoid damaging the board surface. Carefully check its level, as any deviation will be magnified in subsequent installations.
Cutting and Fitting Boards: Navigating Corners and Outlets
During installation, you will need to precisely cut these boards to accommodate wall lengths, corners, and obstacles such as outlets and switches. Use a tape measure to determine the required length of the boards and cut them with a miter saw or circular saw. When dealing with corners, a 45-degree miter cut is typically used to create a neat joint. For outlets and switches, measure and mark the opening positions, then use a jigsaw or hole saw for precise cutting. Always double-check measurements before cutting and wear safety glasses. Ensure cut edges are smooth so that the boards fit snugly.
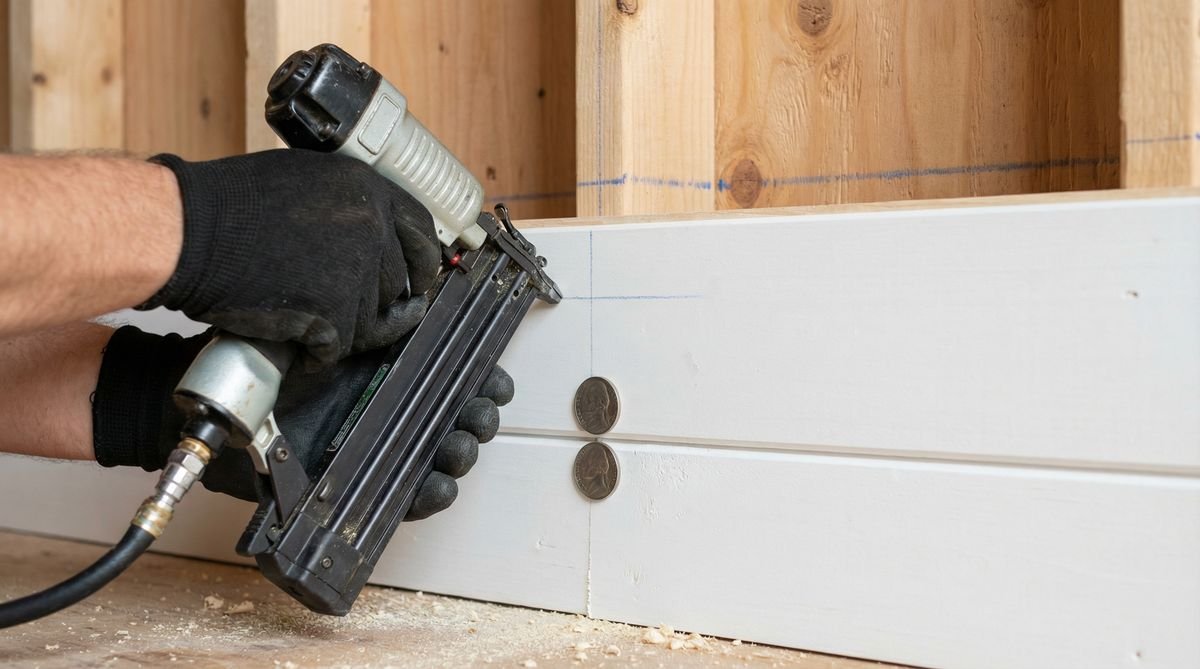
Nailing Techniques: Achieving a Professional Finish
Correct nailing techniques are key to achieving a professional panel finish, ensuring both security and minimal visibility of nails. For most paneling, you can choose to nail into the tongue of the board (if it has a tongue-and-groove structure), so the groove of the next board covers the nail head, making it invisible. If nails cannot be hidden, use finish nails and fill the nail holes with wood putty after nailing, then sand smooth. When nailing, ensure nails are driven into the studs at an angle to increase holding power. Avoid over-nailing, which can cause the board to crack. Maintain even spacing for a beautiful and secure result.
Common Challenges and Troubleshooting
Dealing with Uneven Walls
Uneven walls are a common challenge when installing wall panels, but they can be effectively addressed with proper preparation and techniques. Before installing these panels, carefully check the wall for flatness. If the wall has minor bumps or depressions, you can sand down raised areas or fill depressions with spackle. For more significant unevenness, you may need to install furring strips to create a flat surface. Secure the furring strips vertically or horizontally to the wall studs, then install the panels onto the furring strips. This not only solves the problem of uneven walls but also provides a more robust mounting base for the shiplap.
Seamlessly Integrating Around Windows and Doors
Installing wall panels around windows and doors requires precise measurements and cuts to ensure a seamless and aesthetically pleasing transition. First, measure the dimensions of the window and door frames and calculate the shape the shiplap needs to be cut into. Typically, you will need to cut the panels into an L-shape or U-shape to go around the window and door frames. Use a miter saw or jigsaw for precise cuts and ensure smooth edges. During installation, a small amount of wood glue can be used for additional adhesion, and finish nails can secure the shiplap to the wall studs around the window or door frame. Ensure all joints are tight for a professional appearance.
Finishing Touches: Sealing, Painting, and Trim
After completing the panel installation, the final touches are crucial for protecting the boards, enhancing aesthetics, and extending their lifespan. First, use wood putty to fill all visible nail holes and small gaps between boards, then sand smooth once dry. Next, apply an appropriate sealant or primer based on the shiplap material and your design preference. If planning to paint, ensure a high-quality interior paint is used and applied evenly. Finally, install baseboards, crown molding, or any other decorative trim to complete the overall look of the wall. These details will make your shiplap wall appear more refined and professional.
Maintaining Your Shiplap Wall
Cleaning and Care Tips
To maintain the beauty of your paneled wall and extend its lifespan, regular cleaning and proper care are essential. For daily cleaning, simply use a soft, dry cloth or a slightly damp cloth to gently wipe the surface, removing dust and dirt. Avoid using abrasive cleaners or harsh chemicals, as they can damage the panel’s finish. For stubborn stains, a mild soap solution can be used, followed by immediate drying with a clean cloth. Regularly check the panels for any signs of loosening or damage and repair promptly.
Repairing Minor Damage
Even the most robust paneled walls can experience minor damage, such as scratches, dents, or small cracks, but these can often be resolved with simple repair methods. For minor scratches, a touch-up pen or a small amount of matching paint can be used. For dents, fill with wood putty, sand smooth once dry, and repaint. If small cracks appear, they can be glued with wood glue and clamped until dry. For more severe damage, it may be necessary to replace the damaged panel. Before any repairs, always clean the damaged area and ensure repair materials match the panel’s color and texture.
Frequently Asked Questions (FAQ)
Can you install shiplap without removing drywall?
Yes, in most cases, these wall panels can be installed directly over existing drywall without removal. This method saves time and effort, but it is crucial to ensure the drywall surface is flat, structurally sound, and capable of securely holding the shiplap. You will need to use a stud finder to locate wall studs and nail the panels into them to ensure stability. If the drywall has significant damage or unevenness, it is recommended to repair it first or consider installing furring strips to provide a more solid base.
What kind of nails should I use for shiplap?
For wall panel installation, finish nails or nails specifically designed for nail guns are generally recommended, with sizes chosen based on the panel thickness and wall stud material. Typically, 2-inch finish nails are a common choice, as they can penetrate the shiplap and securely fasten into the wall studs. If using a nail gun, selecting the correct nail type and length is crucial to ensure nails are fully embedded in the board and hidden by the tongue-and-groove structure of the next board, resulting in a more aesthetic finish.
Can shiplap be installed in a bathroom?
Wall panels can be installed in bathrooms, but it requires selecting moisture-resistant materials and proper sealing to prevent moisture damage. It is advisable to use PVC or specially treated moisture-resistant MDF panels in bathrooms, as they offer greater resistance to moisture and water. Additionally, all cut edges and joints should be sealed with a waterproof sealant to prevent water penetration. Ensure the bathroom has good ventilation to reduce moisture buildup, thereby extending the lifespan of the panels.
How do I handle shiplap corners?
There are several ways to handle wall panel corners, with the most common being mitered joints or installing corner trim pieces. For outside corners, the edges of two panels can be cut at a 45-degree angle and joined to form a 90-degree corner, creating a very neat and professional seamless lAnother method is to use pre-made corner trim pieces, installed at the corners to cover the panel edges.the shiplap. For inside corners, the edges of the panels can usually be butted together, and the gap filled with caulk.
Does shiplap make a room look bigger?
Wall panels can indeed make a room appear larger through visual effects, depending on its installation direction and color choice. Vertically installed panels can visually stretch the height of a room, making ceilings appear taller, which is ideal for rooms with low ceilings. Horizontally installed panels can broaden the visual effect of a room, making narrow rooms appear wider. Choosing light-colored or white panels also reflects more light, making the room feel brighter and more open. Therefore, selecting the appropriate installation method and color based on the room’s specific conditions and desired visual effect is crucial.
Conclusion
References
[1] This Old House. (n.d.). How to Make Miter Cuts.Wall panels, with their unique charm and versatility, offer endless possibilities for home decor. Whether aiming for rustic warmth or modern simplicity, these panels can effortlessly integrate and elevate the style of any space. Through the detailed steps and practical tips provided in this guide, even DIY beginners can confidently complete this wall panel installation, personally creating a home filled with personality and aesthetic appeal. This transformation will not only add visual attractiveness to your living space but also enhance comfort and value. Now, it’s time to pick up your tools, embark on your wall panel installation journey, and enjoy the pleasure of creating a beautiful home! For more shiplap installation tips, explore various online resources.