


Understanding Barn Doors and Their Appeal
Barn doors provide a stylish, space-saving solution for interior doorways, adding a rustic or modern touch while freeing up floor space typically occupied by swinging doors. Originally designed for agricultural buildings, barn doors have evolved into a popular interior design element. Their unique sliding mechanism makes them ideal for areas where a traditional door’s swing would be impractical or obstructive, such as small bathrooms, closets, or laundry rooms. Beyond their functionality, barn doors offer significant design versatility, available in various materials, finishes, and styles that can complement any home decor, from farmhouse chic to contemporary minimalist.
Essential Tools and Materials for Installation
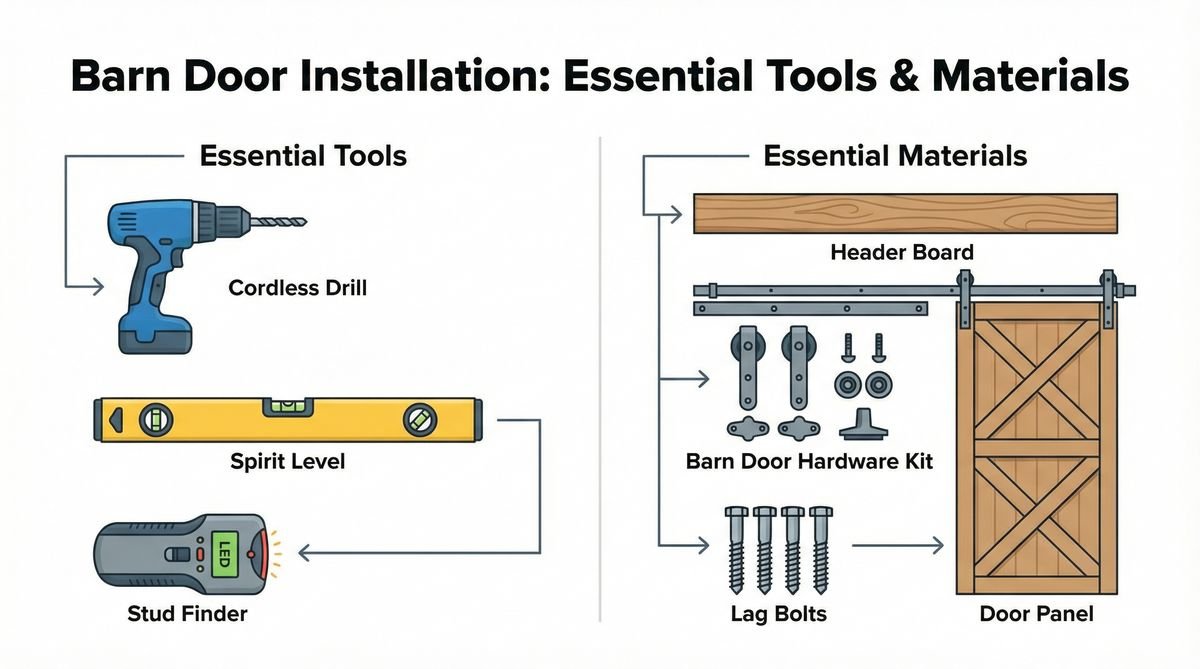
Successful barn door installation requires a specific set of tools for accurate measurements, secure mounting, and precise adjustments, along with the right hardware kit and a sturdy header board. Before beginning your project, gather all necessary tools and materials to ensure a smooth and efficient installation process. This includes measuring tapes, levels, drills, stud finders, saws, and safety gear. The barn door hardware kit, which typically includes the track, hangers, and floor guides, is crucial. Additionally, a robust header board is often required to provide a secure mounting surface for the track, especially when wall studs do not align perfectly with the desired track placement.
Tools Checklist
- Measuring Tape
- Pencil
- Level (4-foot recommended)
- Stud Finder
- Drill/Driver with various bits
- Miter Saw or Circular Saw (for header board)
- Socket Wrench Set
- Clamps
- Safety Glasses
- Gloves
Materials Checklist
- Barn Door (sized appropriately for your opening)
- Barn Door Hardware Kit (track, hangers, rollers, floor guide, stoppers, anti-jump discs)
- Header Board (1×4 or 1×6 lumber, length at least twice the width of the door opening, preferably longer)
- Wood Screws (for header board, long enough to penetrate studs)
- Wood Filler (for patching old hinge holes)
- Paint or Stain (to match or complement the door and trim)
Preparing Your Standard Door Frame for a Barn Door
Proper preparation of your existing door frame is a critical step to ensure a seamless and aesthetically pleasing barn door installation. This involves removing the old door and its hardware, patching any resulting holes, and ensuring the wall space around the opening is clear and suitable for the barn door’s movement. Begin by carefully detaching the existing door from its hinges and removing the door frame’s strike plate and hinges. Fill any screw holes or imperfections with wood filler, sand them smooth, and paint or stain to match the surrounding wall or trim. This meticulous preparation ensures a clean slate for your new barn door, preventing any visual distractions or functional impediments.
Removing the Existing Door and Hardware
- Remove the door: Use a drill or screwdriver to remove the hinge pins and carefully lift the door off its hinges. Enlist a helper if the door is heavy.
- Remove hinges and strike plate: Unscrew and remove all hinges from the door frame and the door itself. Also, remove the strike plate from the door jamb.
- Patch and finish: Fill any holes left by the hinges and strike plate with wood filler. Once dry, sand smooth and paint or stain the patched areas to blend with the existing trim.
Installing the Header Board and Track System
The header board serves as a crucial anchor for your barn door track, providing a stable and secure mounting surface that distributes the door’s weight evenly across wall studs. This step is particularly important if your wall studs do not align perfectly with the desired track placement, or if the wall material is not strong enough to support the door directly. Measure and cut the header board to the appropriate length, ensuring it extends beyond the door opening on both sides to accommodate the barn door’s full travel. Use a stud finder to locate and mark wall studs, then securely fasten the header board to these studs using long wood screws. Once the header board is firmly in place, you can proceed with mounting the barn door track according to the manufacturer’s instructions, ensuring it is perfectly level for smooth door operation.
Mounting the Header Board
- Measure and cut: Determine the length of your header board. It should be at least twice the width of your door opening, plus an additional 6-12 inches on each side for aesthetic balance and functional clearance. Cut the 1×4 or 1×6 lumber to this length.
- Locate studs: Use a stud finder to locate the wall studs above your door opening. Mark their centers with a pencil. It’s crucial to attach the header board to at least two studs for stability.
- Pre-drill and mount: Hold the header board against the wall, ensuring it’s level. Mark the drilling points that align with the studs. Pre-drill holes through the header board and into the studs. Secure the header board to the wall using long wood screws, ensuring it is firmly attached.
Attaching the Track
- Mark track placement: Following your hardware kit’s instructions, mark the precise location for the track on the header board. Ensure the track is perfectly level.
- Drill pilot holes: Pre-drill pilot holes for the track mounting screws into the header board.
- Mount the track: Securely attach the barn door track to the header board using the provided hardware. Double-check that it is level and firmly in place.
Hanging the Barn Door and Final Adjustments
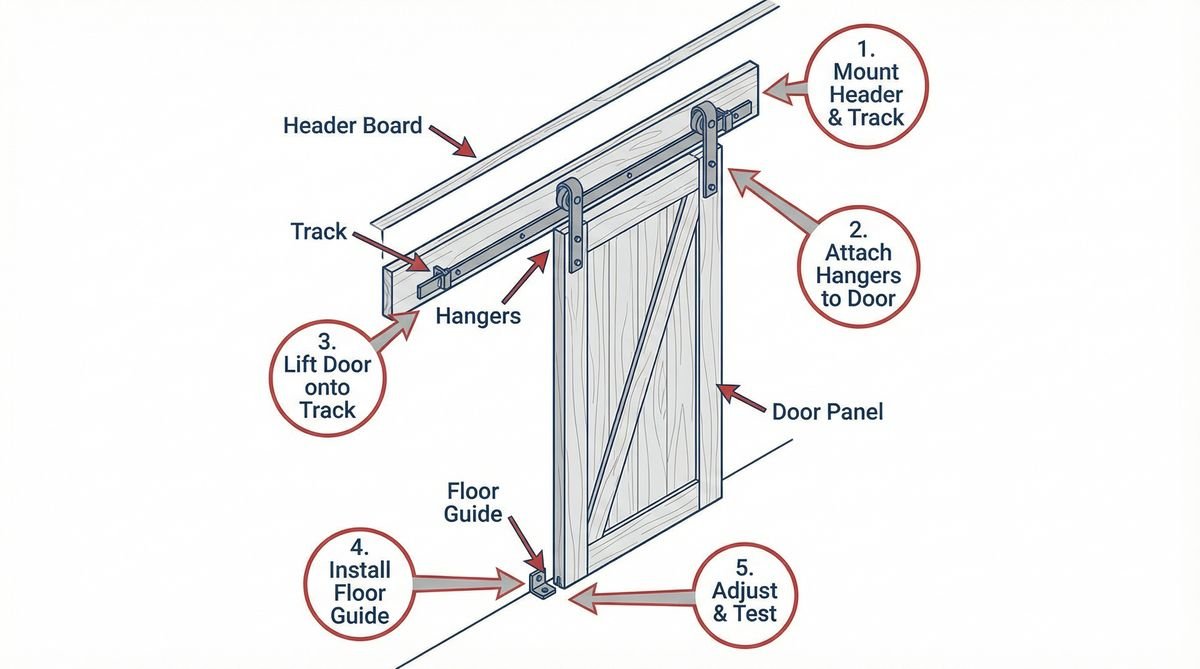
Hanging the barn door onto the installed track and making final adjustments are the concluding steps that bring your project to life, ensuring smooth operation and a polished appearance. This process typically involves attaching the hangers to the top of the barn door, carefully lifting and hooking the door onto the track, and then installing the floor guide and anti-jump discs. With the door hanging, adjust the rollers and stoppers to ensure the door glides effortlessly and stops precisely where desired. Finally, install the floor guide to prevent the door from swinging outwards and the anti-jump discs to keep the door securely on the track. These final touches guarantee both the functionality and safety of your newly installed barn door.
Attaching Hangers to the Door
- Mark hanger positions: Measure and mark the positions for the hangers on the top edge of your barn door, following the manufacturer’s instructions. Ensure they are evenly spaced and aligned.
- Attach hangers: Drill pilot holes and securely attach the hanger straps and rollers to the door using the provided bolts and nuts.
Hanging the Door on the Track
- Lift and hook: With the help of a partner, carefully lift the barn door and hook the rollers onto the track. Ensure both rollers are properly seated on the track.
- Install stoppers: Slide the door to its open and closed positions and install the track stoppers at the desired points to prevent the door from rolling off the track.
Installing the Floor Guide and Anti-Jump Discs
- Position floor guide: With the door hanging, position the floor guide beneath the door, ensuring it keeps the door stable and prevents it from swinging outwards. Mark its mounting holes.
- Secure floor guide: Drill pilot holes and secure the floor guide to the floor according to the manufacturer’s instructions.
- Attach anti-jump discs: Install the anti-jump discs on the top edge of the door, above the track, to prevent the door from accidentally lifting off the track.
Troubleshooting Common Barn Door Installation Issues
Even with careful planning, minor issues can arise during barn door installation. Common problems include doors that don’t slide smoothly, uneven gaps, or alignment issues. Addressing these challenges often involves re-checking measurements, adjusting hardware, or reinforcing mounting points. For instance, if the door sticks, ensure the track is perfectly level and free of obstructions, and lubricate the rollers if necessary. Uneven gaps might indicate an improperly leveled track or an issue with the door’s dimensions, requiring minor adjustments to the track’s height or shimming the door. Always refer to your hardware kit’s instructions for specific troubleshooting tips and consider consulting a professional if persistent problems occur.
Door Not Sliding Smoothly
- Check level: Ensure the track is perfectly level. Even a slight tilt can cause the door to stick or roll unevenly. Adjust the header board or track as needed.
- Clear obstructions: Verify that there are no obstructions on the track or in the path of the rollers.
- Lubricate rollers: Apply a silicone-based lubricant to the rollers if they are stiff.
Uneven Gaps Around the Door
- Re-check level: An uneven gap at the bottom or sides often indicates an unlevel track. Re-measure and adjust.
- Door dimensions: Ensure the door itself is perfectly square and the correct size for the opening.
Door Swings Outwards
- Floor guide: Confirm that the floor guide is properly installed and adjusted to prevent the door from swinging.
Frequently Asked Questions
Can I install a barn door on a standard door frame?
Yes, you can install a barn door over a standard door frame. You will need to remove the existing door and hardware, patch any holes, and install a header board above the frame to support the barn door track.
Do I need a header board for a barn door?
A header board is highly recommended for barn door installations, especially if your wall studs do not align perfectly with the track’s mounting holes. It provides a secure and stable surface to distribute the door’s weight.
How much wider should a barn door be than the opening?
A barn door should ideally be 2 to 4 inches wider than the door opening to ensure adequate coverage and privacy when closed.
How high should I mount the barn door track?
The height of the barn door track depends on the height of your door and the specific hardware kit. Generally, the track is mounted a few inches above the door opening, allowing for proper clearance and operation.
Do barn doors need a bottom track?
Most barn doors do not require a full bottom track. Instead, they use a small floor guide to keep the door aligned and prevent it from swinging outwards.
Conclusion
Installing a barn door on a standard door frame is a rewarding DIY project that can significantly enhance the aesthetics and functionality of your home. By following these detailed steps, from preparing your door frame to making final adjustments, you can achieve a professional-looking result. Remember to prioritize accurate measurements, secure mounting, and careful attention to detail throughout the process. Enjoy the renewed charm and practicality that your new barn door brings to your living space.
References
Lowe’s. “How to Install Indoor Sliding Barn Doors in One Weekend.”